Showing posts with label projects. Show all posts

Thursday, June 6, 2013

A Couple For Always Cards

What's this?  A new post?  It can't be!  Well, it's officially summer break, so there is a chance I'll be posting more regularly, at least for the next few weeks.  I have lots of projects to share, but it will take m e some time to get them all photographed to post.  I happened to have these two on my phone, so I thought I'd share.

The first one I made for my future sister-in-law for her birthday.  I just love the black and white with a splash of color, and of course, I had to add some bling.  I'm sure this card was inspired by someone, but I can't find anything similar in any of my files on the computer or Pinterest, so I can't give credit.

**edit--I found the inspiration for this card here on the annieworks blog.  


This card was for my mom for Mother's Day.  She wants to re-do her office in a Paris theme, so we got her all Paris items to use for decorating.  I just had to make a card to match.  I used the Eiffel Tower from stamp set that came with the Le Bella Vie kit in the last catalog.

I also had to share this.  I made this cake for my brother and his fiancĂ© for their housewarming.  It was my first attempt at anything of this type.  I've seen the diaper cakes, and then came across some kitchen ones on Pinterest.  The bottom is a tin of cookie cutters, and the top is a glass measuring/mixing bowl. 


Tuesday, August 21, 2012

First Day of School Labor of Love

I don't know what I was thinking.  As if I didn't have enough to do to prepare for the first day of school tomorrow.  Today I found a fun starter/ice breaker activity using Skittles.  Now I could have just handed out candy at the beginning of the activity, but I decided that I needed to make something cute to hold the Skittles and brighten their desks for the first day of school.  

I whipped out my Cricut Art Philosophy cartridge and cut these fun little bags.  The half circles were the inside of the handles.  Originally I also cut little tags to go on them with their names, but decided tying all those on would be too time intensive for tonight.  I just wrote their names on the bags.  In addition to these, everyone will get a bookmark and maybe a pencil (I have to see what I have when I get to school tomorrow.  

I'm hoping for a fabulous start to the school year tomorrow!  

At Albertsons on the way home tonight (when I stopped to pick up the Skittles), I saw this in the parking lot.  It made me smile, and of course started the jingle running through my head.  The only bummer was that by the time I picked up the boys and went back, it was gone :(  They did tell me they saw it driving down the road on the way back from the movies with Grandma.  


Monday, January 16, 2012

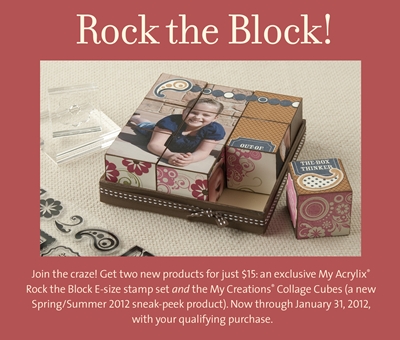
Rock the Block Valentine's Blocks

I haven't had a whole lot of time to play my Rock the Block set, but I did get one side done today.  I want to use mine to be year-round decor for either my fireplace mantel or entertainment center.  I am planning to create the following six sides:
1) Valentine's Day
2) Spring/Easter
3) Summer/Fourth of July
4) Halloween
5) Thanksgiving
6) I haven't decided.  Originally, I though Christmas, but I have so much Christmas decor, I'm thinking maybe just a general family theme.  

I'll post them as I finish.  Here's the Valentine's themed side.  I used retired Sweetheart papers (on clearance now on my website).  I also used Mad About You (December SOTM) and Rock the Block stamps. The hearts and letters were cut on the Cricut.  


Remember, you can get the blocks and the exclusive E-sized stamp set for just $15 with a $25 purchase.  It's a great deal for the stamp set alone!


Saturday, December 24, 2011

Let It Snow Banner

This is the third and final banner I made as a Christmas gift.  While I love the first two, I am in love with the Wonderland paper, so I'm partial to this one.  The Twilight/Crystal Blue/Chocolate combo is one of my favorites!  Not to mention the sentiment is very fitting!  No White Christmas here, not even in the mountains.  How can it be CHristmas with no skiing and no snow in the mountains?  Luckily, the tubing hill was able to make snow, so we'll be able to participate in our post-Christmas tradition.  

Anyway, I used Wonderland papers, several stamp sets, and the Art Philosophy (shapes) and Plantin Schoolbook (letters) Cricut cartridges.  I love that the Art Philosophy cartridge coordinates with our stamps, so I can cut the snowflakes and then stamp them--so fun! 


Friday, December 23, 2011

Joy Banner

Here's banner #2.  This one also uses Believe papers and Art Philosophy and Plantin Schoolbook cartridges.  It was my first try making the paper medallions, and I love the way they turned out.  


Thursday, December 22, 2011

Believe Banner

This is banner #1 of 3.  I made these for certain family members for Christmas (don't want to completely spoil the surprise by saying which ones).  This one used Believe papers and my Art Philosophy and Plantin Schoolbook  Cricut cartridges.  I also used several stamp sets.  The photos aren't stellar, but you get the idea :) 


Up close shots.


Here's a coordinating gift card holder I made using the same supplies.


Wednesday, August 10, 2011

Wicked and Mischief

I got my CTMH order filled with all the new goodies, and I've been having loads of fun playing!  One of the Workshop on the Go kits I bought was Mischief.  I love that these papers can be used for Halloween, fall, or masculine cards.


The bonus project in the kit was a Halloween banner.  I used the basic layers, but changed up the embellishments, and added images from the Stamp of the Month.  I also used the new Art Philosophy Cricut Cartridge for the letters.  I guess it looks pretty darn good because when Mike got home, he looked at it funny and wondered why I was already out buying Halloween decorations.  He was relieved when I said I made it :)
 A few close up shots.


This is the first layout in the workshop.  The only unscrapped Halloween photos I have are red and blue and didn't look right, so I'll save it for this year's Halloween pics.  I didn't finish the other layout yet.


A card I made with the new August Stamp of the Month.  I am loving the new SOTM program.  Now when you spend $50, you get the stamp for $5.  As an added bonus this month, you also get the Typeset Alphabet set FREE!  I love the witch in this set.  I can see her with sparkly red shoes or purple and green tights.  Too fun!  I also love that you can use the sayings for multiple types of cards--"hats off to you and  put your best foot forward."  

Thursday, August 4, 2011

Event Calendar

My scrapbook club wanted to make Event Calendars instead this month, so this is the project we will be making tonight.  I used scraps from lots of paper packs, June's Stamp of the Month, our month stamps from a few years ago, and Embrace Life (bicycle).  I don't think I've ever done another project that made such a huge mess out of my scrap room :)  


I still haven't decided how I want to finish out the cover.  It's tough because it can't be too bulky or it won't hang right on the wall.   I sure wish my new Art Philosophy Cricut cartridge was here already!

Wednesday, July 1, 2009

Memory Keeper Box/Card Holder


I finally opened up my Tickled Pink kit and got some use out of it. I made one of the layouts, but I don't have pictures yet, so I'll hold off posting it. As I've stated before, I'm working on organizing my card stash, and I'm slowly putting together Memory Keeper boxes to hold my various cards. This one is to hold Thank You cards. The picture is old, but one of my favorites. Plus the colors match perfectly. I originally had White Daisy Textured cardstock there with rub-ons, but it was too distracting with all the flowers, so I opted for a photo instead.
Now I want to make one more for Christmas cards, and I think I'll be good to go for a while. To see my Birthday and Thinking of You boxes, click here